Copy link
Important
In the current version of the native application, it is essential to run or open the native application each time you want to use it. Once opened, you can use the Copy application by accessing EACAT or the web component when using the service through integration.
- On November 23, 2017, the native application was updated to solve some problems that had been detected with some "flatbed" or tabletop scanners (those that do not have a sheet feeder).
- On July 11, 2018, the native application was updated to fix some problems with certain scanners that caused the CÒPIA application to not detect that the digitization had been completed and to remain permanently on hold. With the new improvement, a button has been added that allows the user to end the digitization process when he deems it convenient. For this reason, we recommend downloading the latest version of the native application.
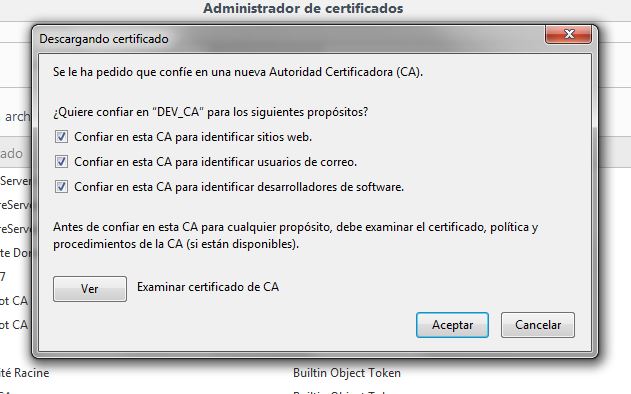
- On July 5, 2019, a new update was made to renew the certificate of the native application due to the expiration of the previous one on 08/27/2019. The application will need to be updated after deleting the old certificate from the Windows certificate store. In this regard, we detail the steps to follow below:
- Open the Windows console and access the certificate store by following the steps below:
- Select Run from the Start menu, then type mmc . The MMC console appears.
- From the File menu, select Add/Remove Add-ons . The corresponding window will appear.
- From the available add-ons choose certificates , then select add .
- Search for the 'DEV_CA' certificate in “Trusted Certification Entities” and delete it. Accept the deletion.
- Run the new native application and accept the installation of the new certificate.
- On December 9, 2020, the native Copy application was updated to allow:
- choose the tray or glass feeder if the scanner incorporates both options.
- choose the scanner with which you want to make the copy in case the user has more than one connected to the computer.
The only technical requirement to be able to use the native application is that the user's computer has a Java JRE component with version 1.8 or higher to be able to run this application.
In order to establish the connection between the scanning device and the CÒPIA service web application, it is essential to install the following native application on the computer:
- 32-bit operating system (December 2020 version): download
- 64-bit operating system (December 2020 version): download
This native application acts as a bridge between the image acquisition hardware (scanner, camera) and the service's web application.
The standards supported by this native application are the following:
- Windows
- WIA (Windows Image Acquisition)
- MAC OS X:
- ICA (Image Capture Application)
For more information you can consult: http://www.gnome.sk/Morena/morena.html
- Once you have downloaded the ZIP file of the native application (depending on your operating system), you must unzip and save the corresponding folder to a directory to which you have write permissions (for example, in C:\Users).
- To open the application, simply double-click on the scanner.bat file.

- A window will then open, indicating, after a few seconds, that the application has started correctly. The first time you run it, you will be prompted to install a certificate in your computer's certificate store. Simply click Yes.


- After a few seconds, an icon will appear on your desktop bar indicating that the native application is working correctly.

- If you want to stop the native application, just right-click and click on the following tooltip:

Certificate public key installation
For those users who use the Chrome or Explorer browser, they do not need to take this step since the installation of the public key of the application certificate is automatically installed when the native application is installed.
If you want to use the Firefox browser, before installing the native application, you must load the public key of the following digital certificate into your computer's certificate store so that communication between the application and the server is secure:
Open a Firefox browser window and go to “ Herramientas/Opciones/Advanced/Certificado/Ver certificados ”

Select the "Authorities" tab and press the "Import" button.

In the dialog box, indicate the location on your PC where you downloaded the .cer file that contains the public part of the digital certificate to be installed. Once selected, press the “Open” button.

On the next screen, check all the trust options and click “Accept” to install the certificate.