


 Copy link
1.1 What do you need to create a generic submission?
You must have installed on your computer:
- Adobe Reader version 8.1 or higher.
- A valid T-CAT digital certificate to sign the generic submission or the response communication, which in both cases is mandatory.
- The latest version of Safesign.
1.2 When should you create a generic submission?
When there is no specific procedure in the Procedures Catalog to send the documentation or information you want to send to a specific destination entity.
In the event that you wish to submit a procedure to the Administration of the Generalitat of Catalonia, in application of article 66.6, in relation to article 16.8, of Law 39/2015, of October 1 , the generic submission you have sent will be considered not to have been submitted, if there is a specific electronic EACAT service for the procedure you wish to carry out.
You can find more information in the FAQ about the proper use of generic submission .
1.3 Who can create a generic shipment?
Any user of an entity affiliated with EACAT. No special role is required to create it.
It is very important that you keep in mind that public entities that have an integration with EACAT and access the Generic Transmission service, whether you do it from your application or from the EACAT portal, will have the old version of Generic Transmission.
1.4 How do you access the Generic Delivery service?
Access the EACAT platform with your NIF and password or with a digital certificate (for example, T-CAT or T-CAT P).

Select the Procedures section and press Generic submission .

Write and choose the entity you want to contact, which can be any of the entities in the list of entities affiliated with EACAT (specifically in the column R ECEPCIÓ_TRAMESA_GENERICA , entities that have the service enabled and can receive generic submissions are reported with an S ; and entities that do not have it enabled and cannot receive them are reported with an N ).
When the entity you are addressing does not appear, and is part of the public sector of the Generalitat, you can send the generic submission to the department to which it functionally depends.

In some cases, you will be able to select the administrative unit or body to which the generic submission is addressed , provided that the receiving entity has previously created a User Group/Unit with its name and is enabled to receive generic submissions.
You will find more information in the GU FAQ – How to create user groups? or in point 3. How can you make a generic submission reach a specific unit or body of a public entity?

1.5 How to download the generic submission form?
Once you select the entity and the administrative unit or body, if applicable, you must click Process to download the submission form to your computer.

This form is only valid for a single transaction, as it internally carries a unique identifier and creates an execution thread that allows the future response of the entity to which the submission is addressed to be linked. Therefore, each time you need to create a generic submission, go to EACAT and download a new form.
1.6 How can you fill out the generic submission form?
It is mandatory to fill in the fields Reason , Explanation and Submission type . The remaining fields are almost all optional. Visually, the fields marked with a red box are mandatory and those that are not are optional.

The generic shipment can be of two types according to its functionality:
- Inter-administrative processing between Catalan public administrations , which is the original and most important functionality of generic transmission, consisting of sending information and documentation between one Catalan public administration and another, when there is no specific service prepared to do so.
- The processing of Documentation registered in person and intended for other Catalan public administrations . This is a secondary functionality but no less important. It is used, for example, when a citizen or a company presents a document to a Catalan public administration, but the recipient public administration is another. In this case, you must make a generic submission to the recipient administration, responsible for its processing, attaching the documentation provided by the interested party and informing them of their main details.
a) If you select Inter-administrative processing between Catalan AAPPs
By default, you will find the Inter-administrative processing between Catalan AAPPs option selected, which is the main functionality of the generic submission.

b) If you select Registered documentation intended for other Catalan AAPPs

Remember that this type of generic submission is used when a citizen or company presents a document in the registry at a Catalan public administration, but the recipient public administration, responsible for processing it, is another one.
Therefore, from the entity's registry in which the documentation has been submitted, a generic transmission will be made to the recipient public administration, responsible for processing it, attaching the documentation provided by the citizen or company and informing them of their main data.
In this generic submission method, you must fill in the data relating to the documentation presented by the interested party, which the person responsible for the registration has previously registered in their entry and exit register.

Also, although it is optional, we recommend that you fill in the data relating to the interested party, to facilitate the management of the administration receiving the documentation.
There may be more than one interested person and, therefore, you can add or remove people using the + or - buttons, respectively.
The interested person can appoint a representative and then you will need to fill in the representative's details.
Keep in mind that both the interested party and the representative can be natural or legal persons and depending on the case you will select one or the other option.

In the case of Data of the interested party, whether you select Natural person or Legal person/organization, you must fill in the following fields:

- Name , first surname and second surname , which in the case of legal entities or organizations are replaced by the field Company name . These are the only fields that are mandatory, although it is important that you fill them all out.

- Identification document
- Identification document number, which you can choose from the following options:
- Tax ID
- Passport
- Foreigner identification document
- Other natural person
If the interested party is a Legal person/organization, you can only select NIF .
- Preferred notification channel, which you can select from two options:
- Postal address
- Email address enabled
- Outside Catalonia, which you can select between Yes or No.
- Contact phone number
- Contact email
- Observations of the interested party
If there are several interested parties, when you have finished filling in the fields, press the + button to add the data of another interested party and so on until you are finished. You can also delete the data referring to an interested party by pressing the - button.
If the interested party wishes to designate a representative, select in the Representative details section whether they are a Natural person or a Legal person/organization. In both cases, you have the option of filling in the same fields with the same drop-down menus as in the interested party details. The only difference is that there can only be one representative.

In addition, the form includes a generic section to provide complementary data to the generic submission and a block to attach documentation in three different ways:
- Documentation in electronic format provided with this form
- Documentation in electronic format that is sent via a download URL .
- Documentation that is sent afterwards in a non-scannable format

Fill in the information boxes in each of these sections because, although it is optional, it facilitates the management of the documentation that is being sent through generic submission to the destination entity, which is responsible for processing it.

In Additional information you can add the following information:
- External reference , which can be any type of coding relating to the information or documentation that is the object of the generic submission.
- Observations , which can be any annotation you think is important.
- Documentation attached to the registration (attached to this form and/or sent afterwards) . In this section there is a drop-down menu that allows you to select between 4 options:

- Without attached documentation , when the submission does not require any documentation.
- Documentation in electronic format, when the documentation attached to the generic submission must be in electronic format (either electronically generated documentation or the result of a digitalization process). In accordance with the provisions of Law 39/2015 to avoid processing on physical media. This is precisely why it is the preferred option and, whenever possible, an attempt should be made to send the documentation digitally.

- Documentation in non-digital media, which is used exceptionally.

Therefore, when you cannot digitize the documentation, you must always send it to the postal address of the destination registration office (which is the address that the destination entity has stated in the Address for registration purposes section in the My entity/Consultations and reports section) . This field of the form is for consultation and cannot be modified. This is done to maintain consistency between electronic and postal submissions. You should never digitize in a mixed manner. If you cannot digitize all or part of the documentation, you must send all the documentation to the destination registry office. And you will accompany it with a first sheet, which will be the proof of the registration delivered to the citizen, so that the destination electronic registry can be easily identified.
 - Documentation in electronic format and additionally in non-digital support , when you have completely digitized the documentation, but it cannot be returned to the citizen for functional reasons; for example, when the documentation is received directly from the Post Office.

Documentation in non-digital format will be sent to the postal address of the destination registry office, to maintain consistency between electronic and postal delivery.
And you will accompany it with a first sheet, which will be the proof of registration delivered to the citizen, so that the destination electronic record is easily identified.
You can submit the complementary documentation in digital format in two ways, which are not exclusive:
- By means of files , as long as you do not exceed the weight allowed in the generic submission form. Once the file is uploaded, a drop-down box appears that allows you to specify whether the document is a copy or an original.
The maximum size allowed per file is 5MB, with a total maximum of 10MB.
The supported file types are the following: jpg, jpeg, odt, opd, ods, odg, docx, coc, xlsx, xls, pptx, ppt, pdf, png, rtf, svg, tiff, txt, xslg, gif.
- By URL , which allows you to place the URL of each file, when due to the weight you cannot upload the files directly. You can also put Observations for each URL you upload. We recommend using this option when the document to be attached weighs more than 5MB, as long as your organization has a document download service that is accessible by the receiving entity.

You can describe the documentation in non-digital format that you will submit later.

1.7 How do you validate a generic shipment?
Once you have filled out the form, at least the fields in red that are mandatory, you must press Validate .

And you will see the Validated watermark appear on the left side of the form, which means you can now submit the generic submission form. However, you still have time to modify the form by pressing the Modify button.

1.8 How do you sign a generic shipment?
At this point, the form is ready to be signed. Press Send and select the digital certificate with which you will sign the generic submission. You will be asked to enter the certificate PIN and save the form locally on your computer.

To send a generic submission, it is mandatory to sign it . Therefore, the signing user must have a valid T-CAT digital certificate.

1.9 How do you send a generic shipment?
You can send the generic submission in two ways:
- Through the Send button, which is the most recommended.

This way, you don't have to re-enter EACAT to send; the registration confirmation will appear directly.
The registration receipt has all the information from the entry and exit registration and that of the generic shipment sent, in a flattened form. - Through the Registration Window . You must enter EACAT, in the Procedures section and select Registration Window .

Press Browse to select the signed form, which you previously saved on your computer.
Once the form has been attached, click Process .
And, you will see a screen like this: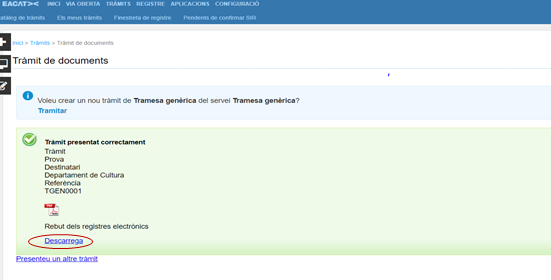
You can download the registration receipt by clicking Download . It contains the same information as the document generated when you submit it from the same form. You can find more information in the GT FAQ – What is the registration window for?
1.10 Who can view a generic submission sent?
The following users can view a generic submission once it has been sent:
- Those of you who have the Service Access role ( Generic Service Configuration service). We call this role colloquially the registration role and it allows you to view all of them.
- The one who downloaded the sent shipment.
- Those who have been assigned to a specific generic submission, by one of the two previous types of users.
These 3 types of users will see one of the following icons next to the generic submissions to which they have access: ![]()
![]() The operation of these icons as well as the User Group/Unit tool is explained in points 4 and 3 , respectively.
The operation of these icons as well as the User Group/Unit tool is explained in points 4 and 3 , respectively.
The generic submission allows a response to be made from EACAT, which will be linked to the original submission, through the processing flow.
2.1 How can you view the received submission?
The users who have access to the generic submissions received are:
- Users who have the registration role .
- The users or groups to whom the registration user has given permission.
- Users who are part of an administrative unit or body selected when creating the generic submission, that is, they are part of a group of users with the Generic submission recipient? check box enabled.
Both the first and last types of users are assigned by the user manager.

Administrative units or bodies are created within the Configuration section, in the User Group/Unit section. They are important, since all users who make up the group will be assigned the permissions to view the generic submission received, automatically, if they have the Generic submission recipient? check box marked, and without the user manager having to assign the permissions user by user.
Users with the registration role can assign specific generic submissions to a specific user or to a group of users (which the user manager will have previously created), thus expanding the group of users who can view and work with a generic submission.
To view the submissions, you must go to My Procedures , where you can see the latest procedures received or sent in the single Procedures tray, which can be filtered by the desired services. If you filter by Service in the Procedures tray, you must select the Generic Submission filter. The service filter is the most common, although you can also filter by the name of the procedure, the sender, the registration number, the file number and/or by dates.

Once filtered, view the received submissions and the following icons will appear on the right: ![]()
![]() , in case they are:
, in case they are:
- Users who have the registration role .
- Users who are part of an administrative unit or body selected when creating the generic submission.
- Users who have been assigned to a specific generic submission, by a user who has the registration role.
2.2 How can you respond to a generic submission?
You will know that you have received a generic submission when you see in the My Procedures Notification , in the Home section, that you have an entry. If you click on it, it will redirect you to the single Procedures tray of My Procedures .
You will find more information in the GT FAQ – What is the procedure notification?

Once in the tray, locate the generic submission you are looking for and you can enter it by clicking on the entry.

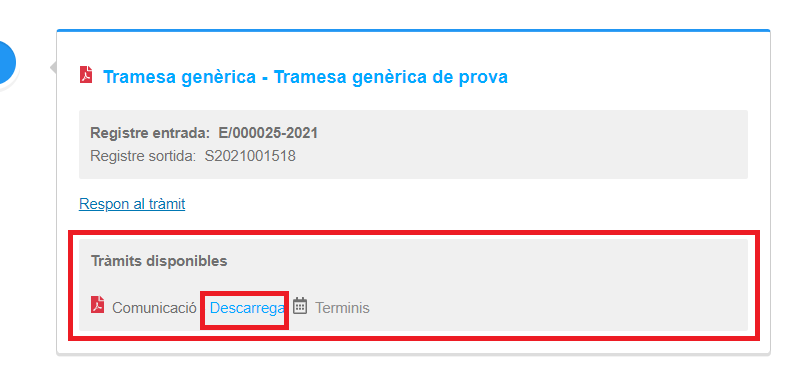
Already in the generic submission you can press Reply to the procedure, to answer it.

Go to the Available procedures section, where the Communication procedure is located, and click Download to download the response form to the generic submission to your computer.
Open the generic submission response form and:
- Fill in the fields that remain empty.
- Sign the response form.
- Submit the response form.
The response form for the generic submission is quite simple and allows you to attach documentation. You will find the fields corresponding to the recipient entity and the subject of the communication automatically filled in.

To complete, validate and send the response to the generic submission, the information provided for the generic submission form is repeated. Once submitted, the registration receipt also appears, which contains the same information as the document generated when sent from the same form.
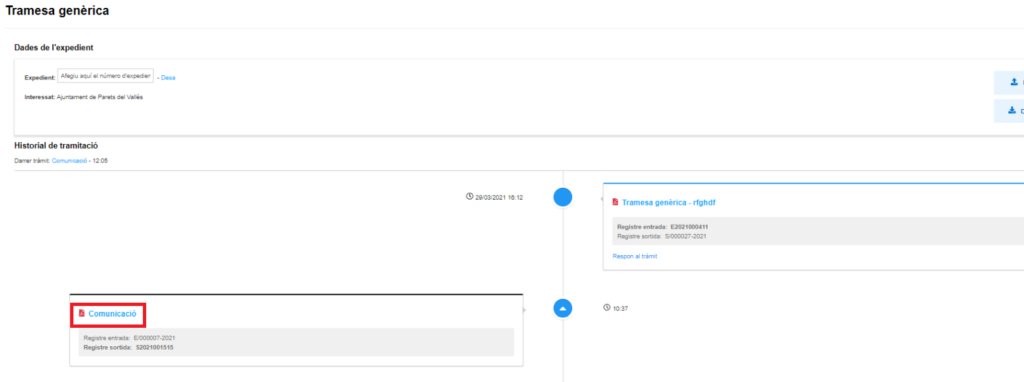
2.3 How can you see the response to a generic submission?
If you access the submission flow screen again, you will see how the response was generated.


It is very important that the destination entity has created user groups related to administrative units or bodies, for several reasons:
- Any user from a source entity can send a generic submission to the created user group.
- The users who make up it can automatically view generic submissions in the destination entity.
- Users who have the registration role should not assign user-to-user viewing permissions.
You will find more information about user groups in the GU FAQ – How to create user groups?
User groups allow users to be assigned to a specific generic submission, so that they can manage it (view and respond, if necessary). You will find more information about user groups in the GU FAQ – How to create user groups?
This functionality is accessed through the icons ![]()
![]() .
.
4.1 Who can assign users to a given generic submission?
Only the following users can assign generic submissions to users or groups:
- Those who have the registration role for all generic submissions from the entity.

- The user who downloads a specific submission to send it.

It is important to know that users who are assigned generic submissions will not be able to assign them to other users or groups .
4.2 Who does the icon appear to?
It appears on the right side of the generic submissions that are displayed in the My Procedures section, in the single Procedures tray.
The users who will be shown the icon are:
- Those who have the registration role .
- Those who have downloaded the generic submission form
- Those that have been assigned via the icon to a specific generic submission, by one of the two previous types of users.
- Users who are part of an administrative unit or body selected when creating the generic submission, that is, they are part of a group of users with the check Generic submission recipient? A blue icon appears for these users
 .
.

Depending on the situation involved, the icon can appear in two different colors:
- Light color
 , which means it does not have any user or user group assigned to manage it.
 - Dark color
 , means that it has a user or group of users assigned to it who can manage it.
4.3 How does the assignment of users to a given generic submission work?
The assignment of users or groups of users is done individually in each generic submission, by pressing the icon. Depending on the color of the icon, two situations can occur:
- Light color
 which means it has not yet been assigned to any user or user group.
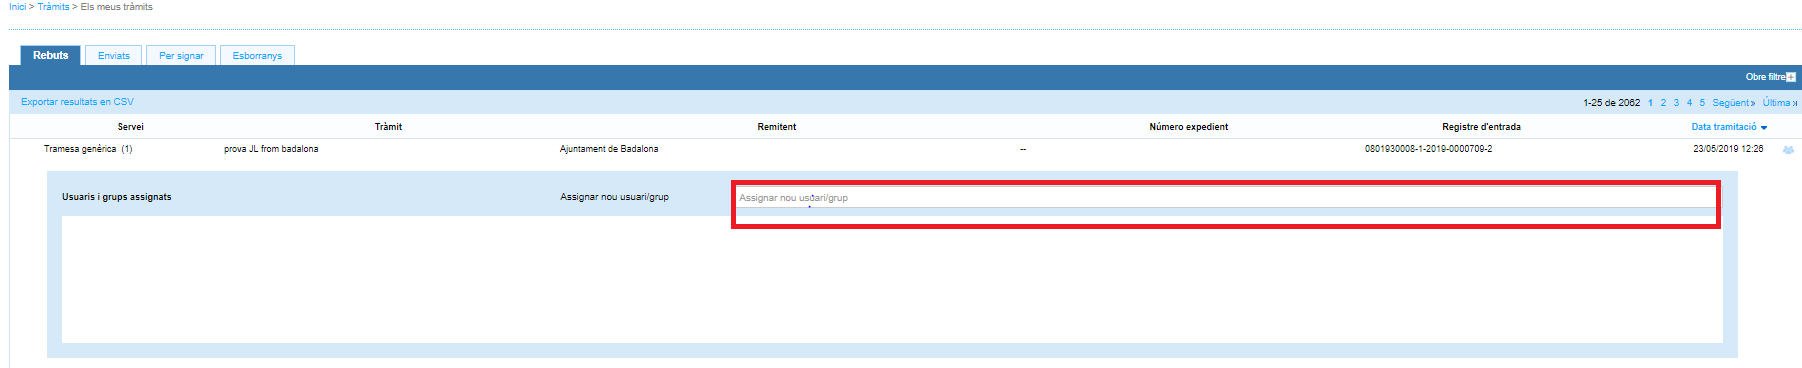
- Dark color
 which means that the submission has already been assigned to a user or group of users.
In both cases, new users or a group can be assigned, simply by entering the user name EACAT or the name of the group, which any of the entity's managers will have previously created in the Configuration section (with predictive search).
On this same screen you can unassign any of the users or groups.

And, you can also view the entity's user groups by clicking View groups .