



 Copy link
1. What are they and what are they used for?
Mailboxes are a new system that allows an entity to organize itself into thematic, organic or functional groupings of services and users, in EACAT Procedures. They are containers of inter-administrative processing services to which you assign users.
This system facilitates the management of access that users have to inter-administrative processing services and improves the internal organization of the entity. Its use is optional and the entity's manager is responsible for managing it (activates, creates, deactivates and deletes mailboxes).
2. When is it advisable to use them?
The management of access to inter-administrative processing services (EACAT Procedures) is carried out through the mailbox system, designed to simplify this task.
Depending on the needs of your organization, you have 2 options :
A) Use the mailbox system
It is the recommended option for entities with a high volume of processing or with many users and has the following advantages :
- Each user only accesses the services assigned to their mailbox.
- It allows services and users to be organized in a clear and structured way.
- It requires initial setup and maintenance effort.
- No need to configure or maintain mailboxes.
- All users view all available services, both existing ones and those that will be added in the future.
- You want all users to have access to all services and then there is no need for the mailbox system. You don't have to do anything.
- If you want users to have restricted access to the EACAT Trámits services , then you need to define a mailbox structure that responds to the organization and access needs of your entity.
- Users can only access and process the services of the mailboxes to which they are assigned.
- The global mailbox is automatically created, which contains all services (current and those added in the future), but does not have any users.
- The Inboxes section and the subsections of the same name in the Users account_circle and Services folder_copy sections are enabled.
- Define the mailbox structure that best suits your organization.
- Create new mailboxes, up to the limit of the assigned quota. This quota is determined by the EACAT administration.
- Assign services, users and, if applicable, organizational units (OU) to each mailbox.
- Assign the same person or service to different mailboxes.
- All users of the entity will have full access to all EACAT Trámits services.
- The Mailboxes section and subsections of the same name are no longer available.
- It is created automatically and cannot be deleted manually.
- There is only one per entity.
- It contains all the entity's specific and generic services, both current and future.
- Initially, it does not have any users assigned. They must be assigned.
- They are created by the entity's manager.
- The number of mailboxes for each entity is the mailbox quota, which is defined by the administrator of EACAT.
- When you create them, they are empty.
- It is necessary to add services, the users who must have access to them and, if applicable, the organizational units (OU).
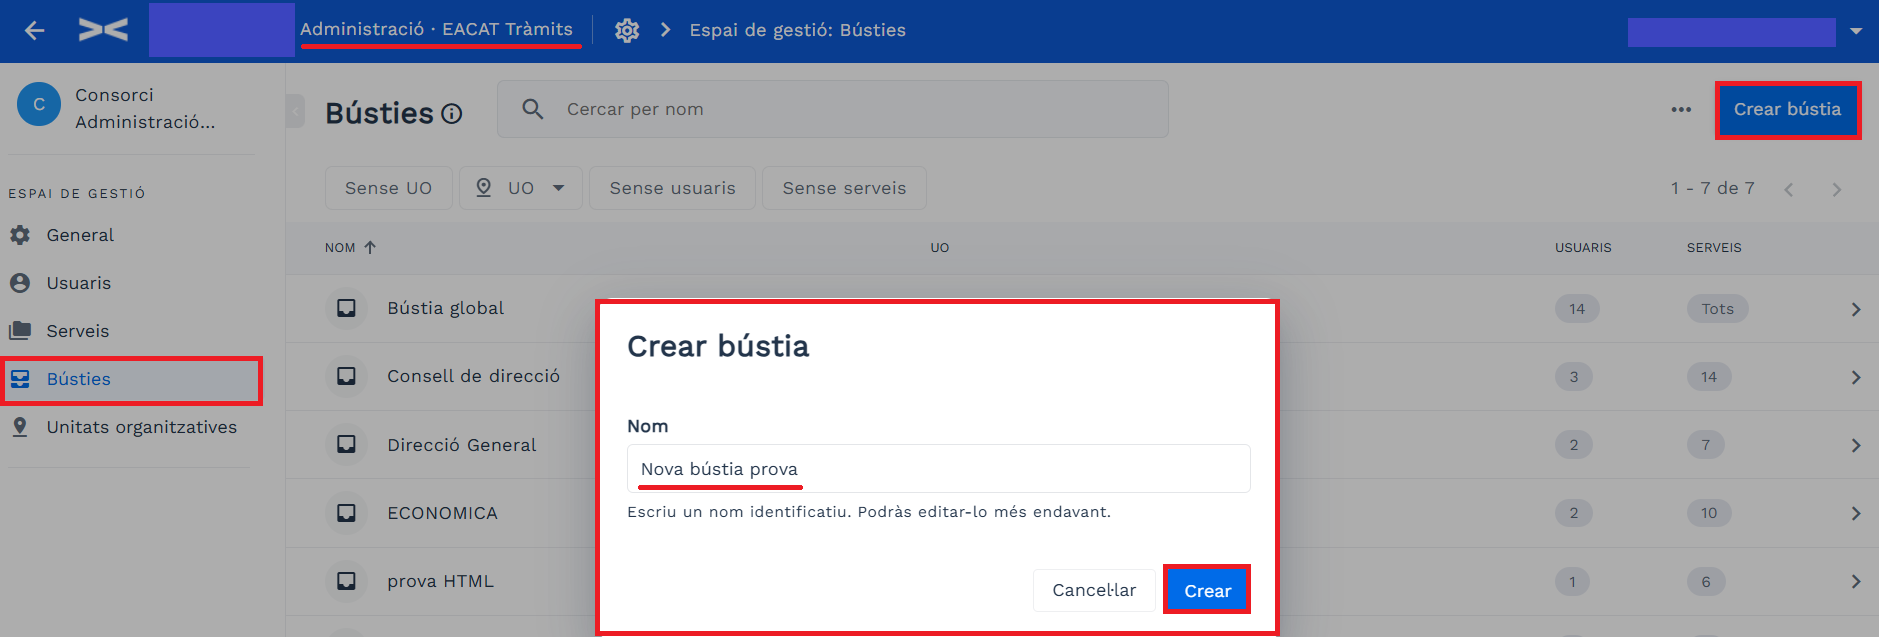
- Go to the Inbox section .
- Press the Create mailbox button and assign it a name.
- Go to the Inboxes section .
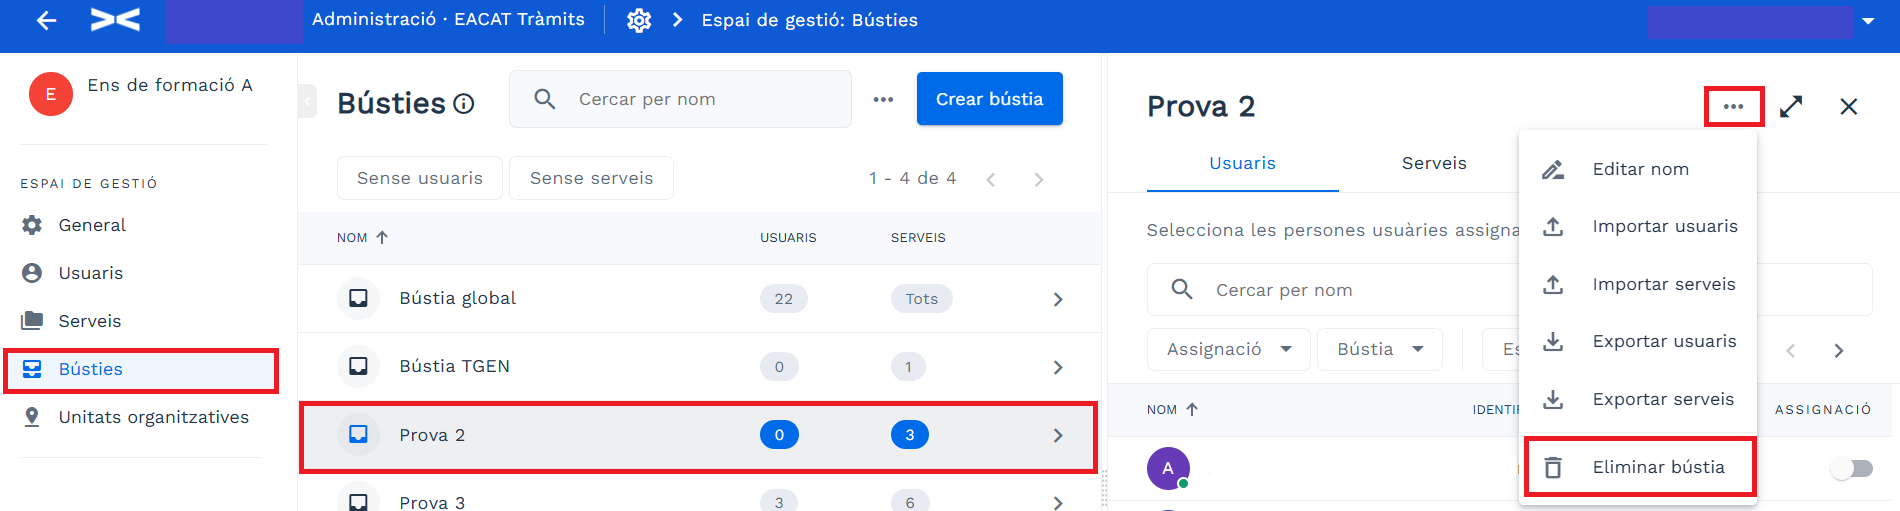
- Select a specific mailbox.
- Press Delete mailbox on the icon …
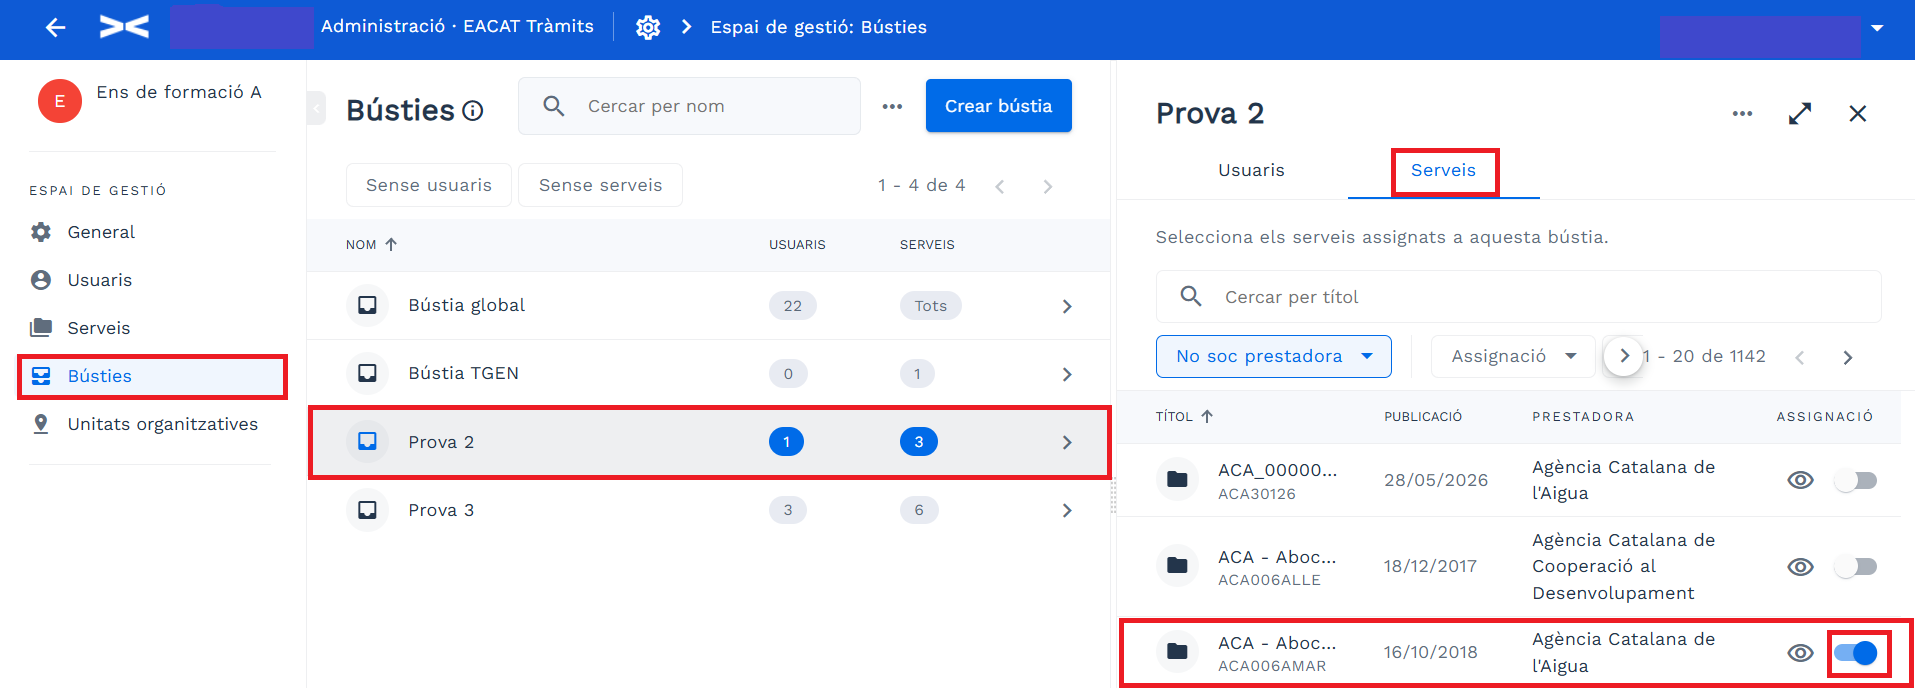
- Go to the Inbox section .
- Select the mailbox to which you want to assign them.
- Select Services and expand the information for the specific mailbox so that you can better view the services and the different filters.
- Search for the service by title.
- Activate the toggle_on switch for the service.
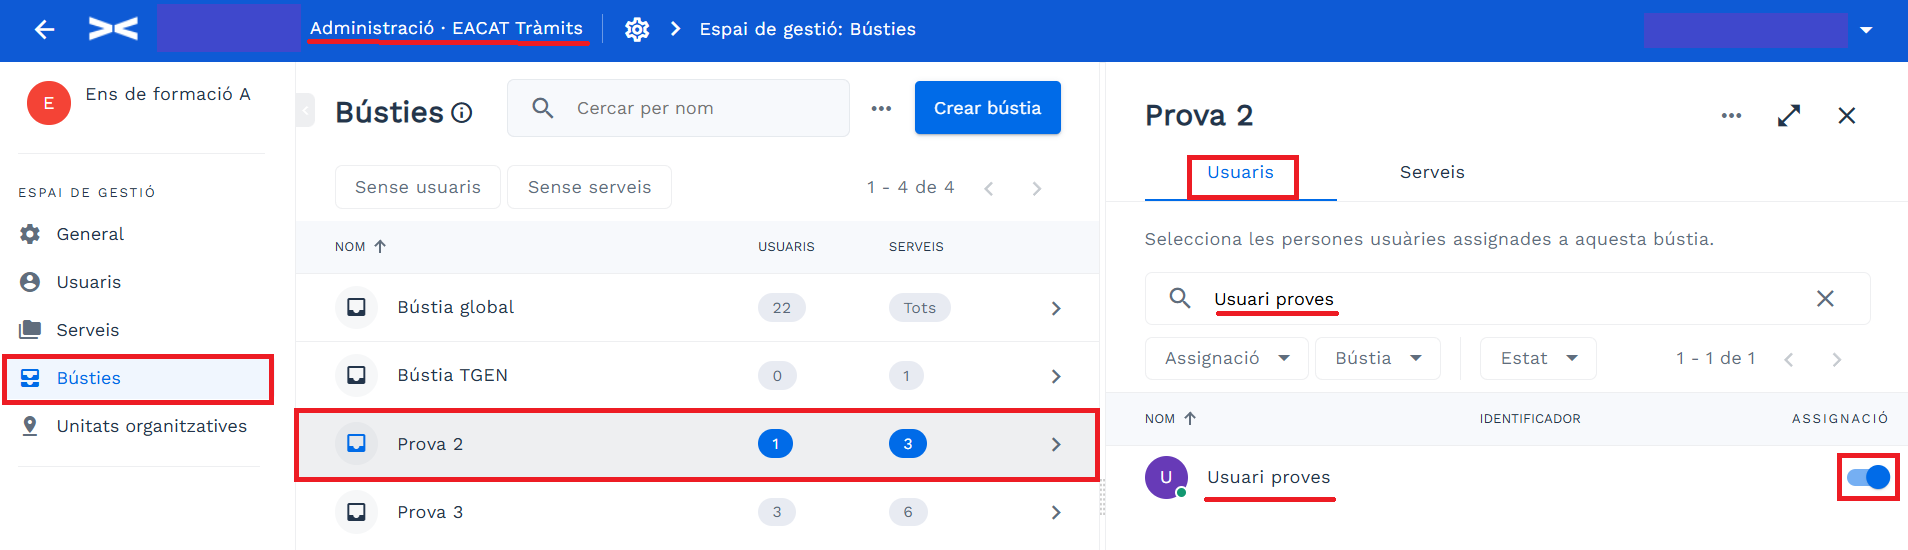
- Go to the Inboxes section
- Select the mailbox you want to add them
- to Select Users
- Search for each person by first and last name
- Activate the toggle_on switch for the user
- Importing to the global mailbox , where you only need to import the users, since this mailbox contains all the services automatically.
- Importing to a specific mailbox , where you need to import both the users and the necessary services.
- 1. Access the Inboxes section
- 2. Select the mailbox where you want to import the services
- 3. Press the ... icon > Import services
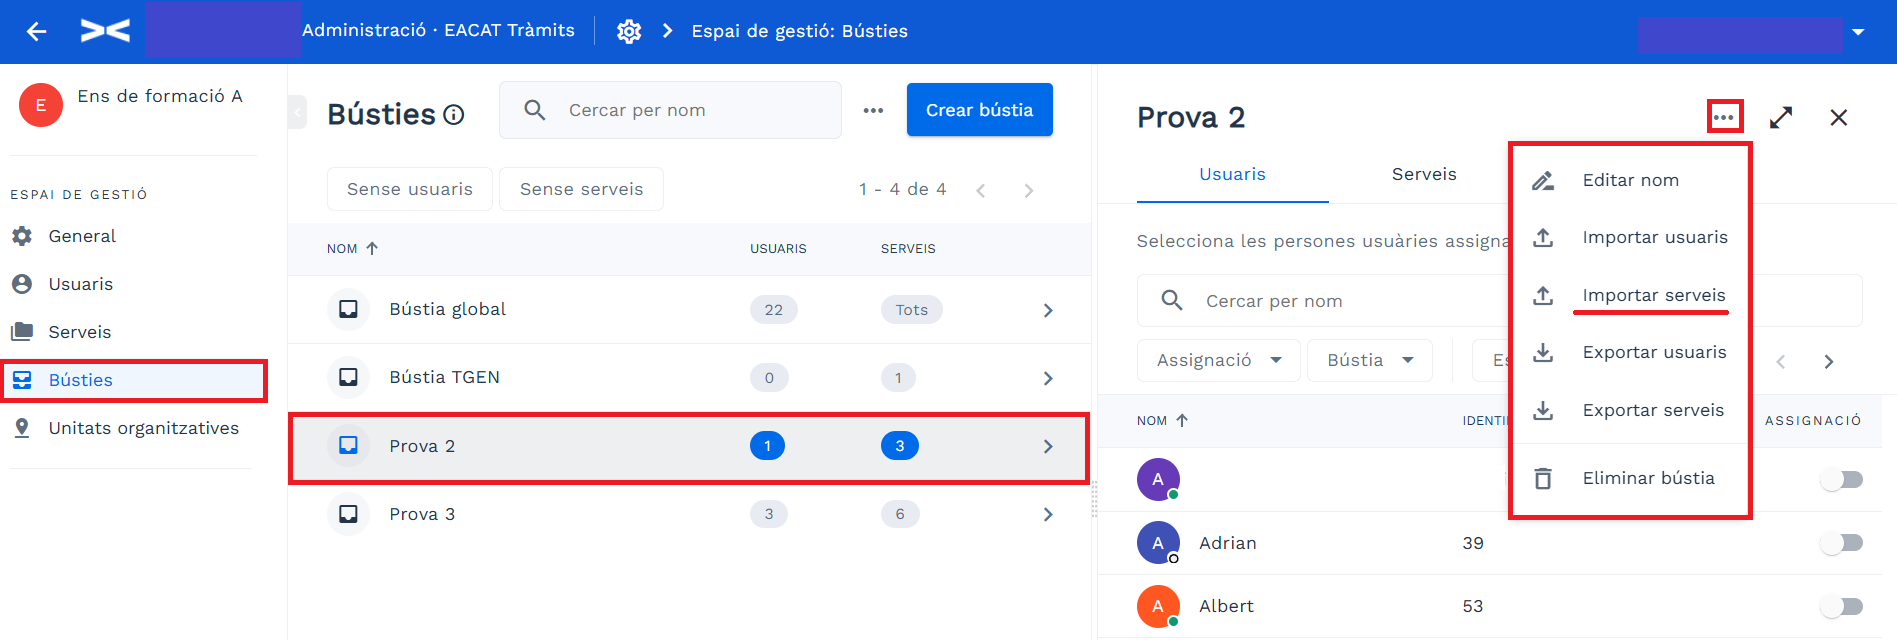
- 4. Select one of the files: Services or Unassigned Services . Decide which one you want to use:
- Services , an empty template named services-box-example.csv is downloaded, to fill in with the Service_Code and Service_Name -
- Services without assignment , a template named services-box-available.csv is downloaded with all the services that are not in the box; for each service we have the Service_Code (functional code), Service_Name (service title), Service_Topic and Service_Subtopic .
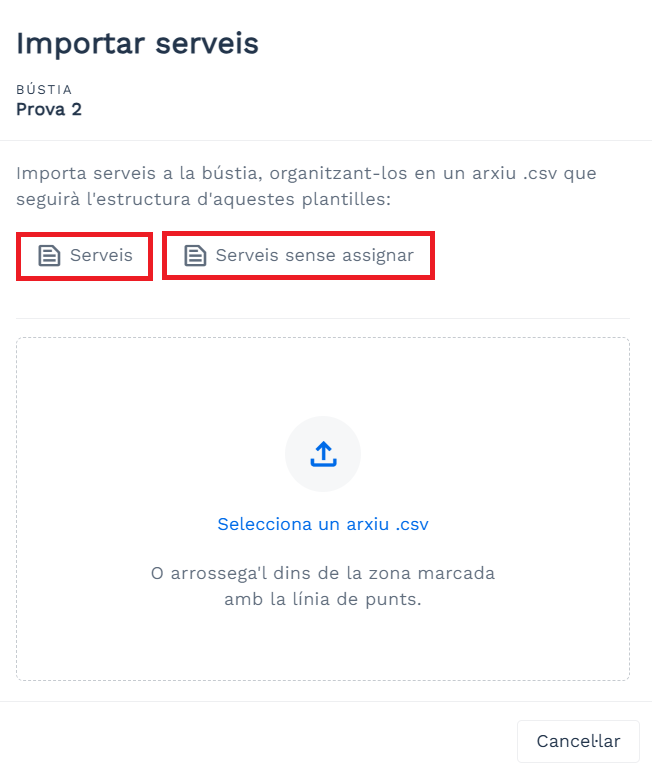
- 5. Download the corresponding template.
- 6. Prepare one of the templates. Only CSV files separated by semicolons (;) are allowed. Remember to leave the first line unchanged, with the names of the fields that come to you by default.
- 7. Upload the prepared file with the import data and you will automatically see it in the list of mailboxes.
- 8. Review the import summary to make sure everything has been uploaded correctly.
- 1. Access the Inboxes section
- 2. Select the mailbox where you want to import the users.
- 3. Press the ... icon > Import users
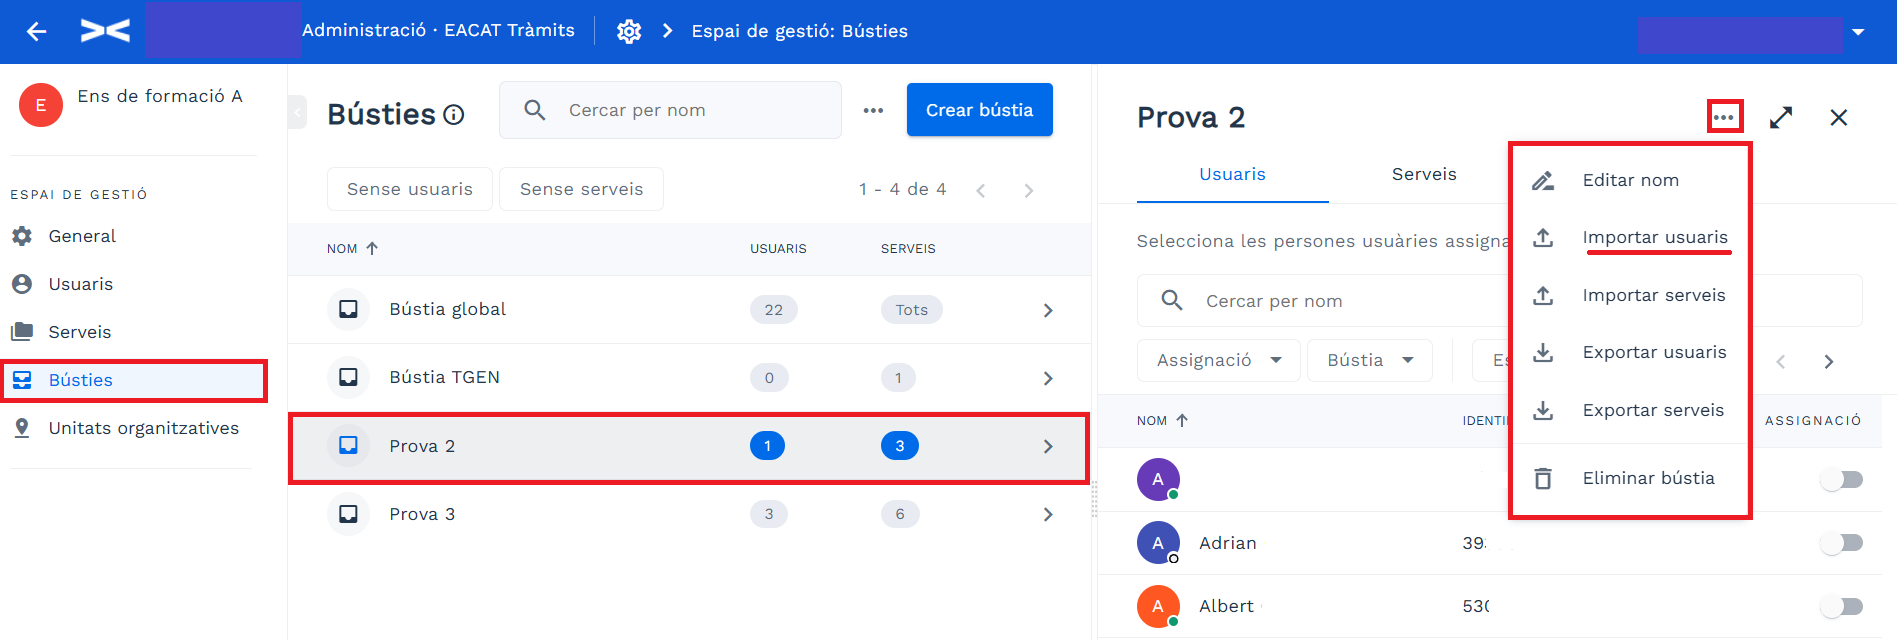
- 4. Select one of the files: Users or Unadded Users. Decide which one you want to use:
- Users , an empty template named users-mailbox-example.csv is downloaded, to fill in with the Identifier and Name of each user.
- Unassigned users , a template named users-mailbox-available.csv is downloaded with all the users who are not in the mailbox; for each user we have the Identifier (NIF or NIE) and the Name (first and last name).
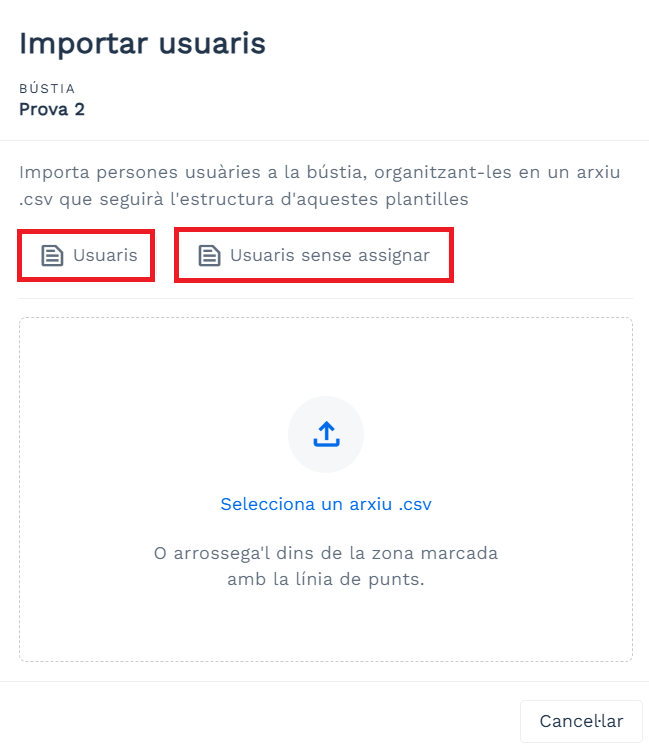
- 5. Download the corresponding template.
- 6. Prepare one of the templates. Only CSV files separated by semicolons (;) are allowed. Remember to leave the first line unchanged, with the names of the fields that come to you by default.
- 7. Upload the prepared file with the import data and you will automatically see it in the list of mailboxes.
- 8. Review the import summary to make sure everything has been uploaded correctly.
- Id , which is the user's identification within EACAT.
- Identifier , which is the user's personal identification number.
- Name , which is the user's name.
- Service_code , which is the service identification code.
- Service_name , which is the service title.
- Service_topic , thematic area within which the service falls.
- Service_subtopic , subtopic areas into which a topic is divided.
- Id , is the identification of the mailbox within EACAT.
- Mailbox name .
- Users , is the number of users found within each mailbox.
- Services , is the number of services found within each mailbox.
- Id_unitat_organizativa , is the identification number of the organizational unit in each mailbox.
- Nom_unitat_organizativa , which is the name of the organizational unit in each mailbox.
- Codi_INE10 : code of the public entity.
- Nom_entity : name of the public entity.
- Nom_mailbox : name of the mailbox.
- Codi_service : name of the service in the mailbox.
- Nom_service : name of the service in the mailbox.
- Identifier : personal identifier of the user.
- Nom_user : name of the user.
B) Do not use mailboxes
It is the recommended option for small entities or for those in which all users must have access to all services (current and future) and has the following advantages:
Before using mailboxes, you should consider whether:<7p>
Good prior reflection will help you define a coherent access system adapted to the needs of your entity.
3. How to activate and deactivate the mailbox system: implications
3.1 Mailbox activation: implications
To enable mailboxes , go to General filter_vintage > Mailboxes > and turn on the toggle_on Use mailboxes in entity switch.
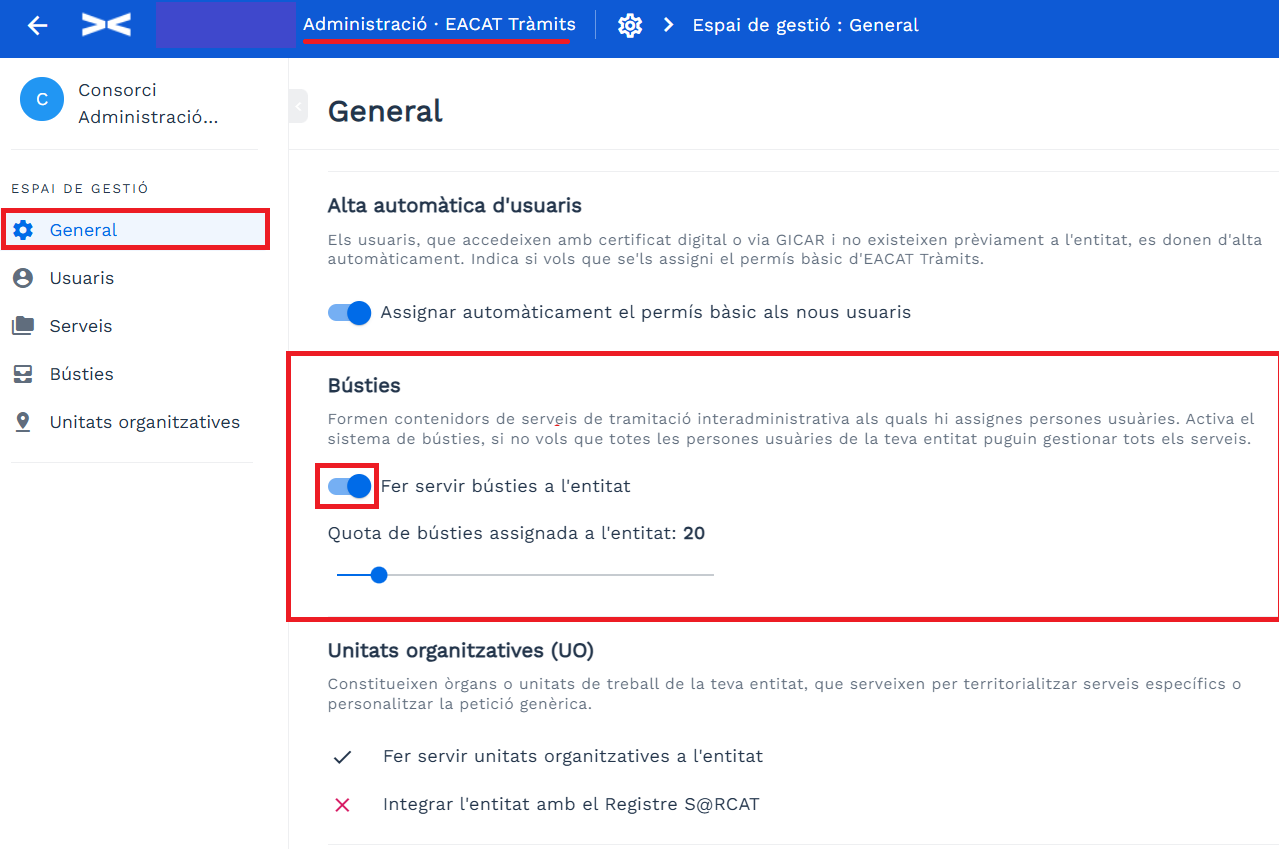
Activating mailboxes implies that:
The tasks to be done are:
Find related information at EGT – How can you organize your entity into mailboxes?
3.2 Deactivating mailboxes: implications
To disable mailboxes , go to General and turn off the Use mailboxes in the entity switch. This affects the entire organization and the work system established so far, but can be reversed by turning them back on.
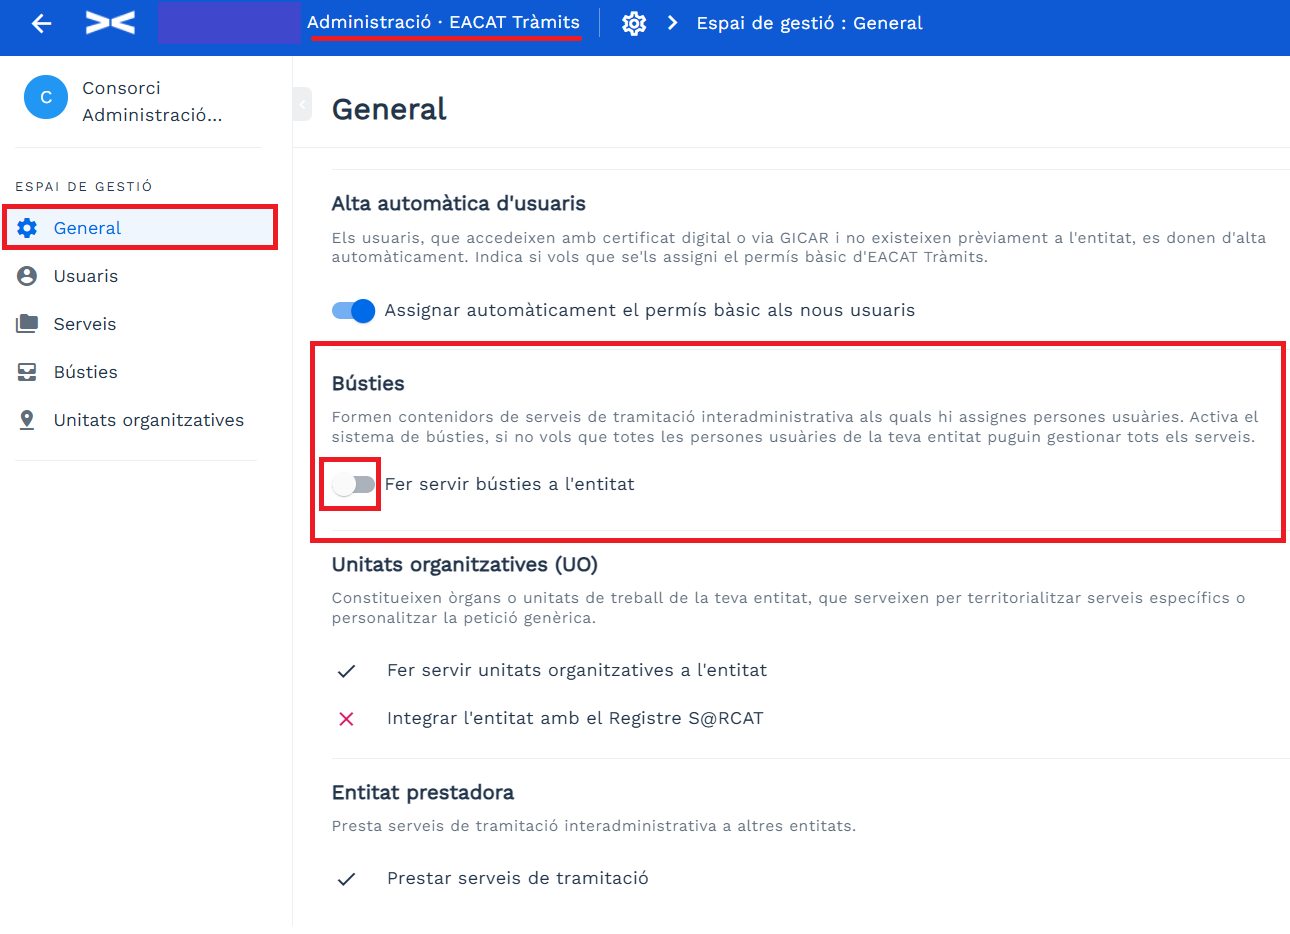
Deactivating mailboxes implies that:
Deactivation does not remove mailbox settings. If you later reactivate the system, all mailboxes, assignments, and structure that existed before deactivation will be restored.
Find related information at EGT – What are the consequences of activating and deactivating mailboxes?
4. What types are there?
There are 2 types of mailboxes :
The global mailbox that is created automatically, once mailboxes are activated in an entity, and which has a series of characteristics that differentiate it from the rest:
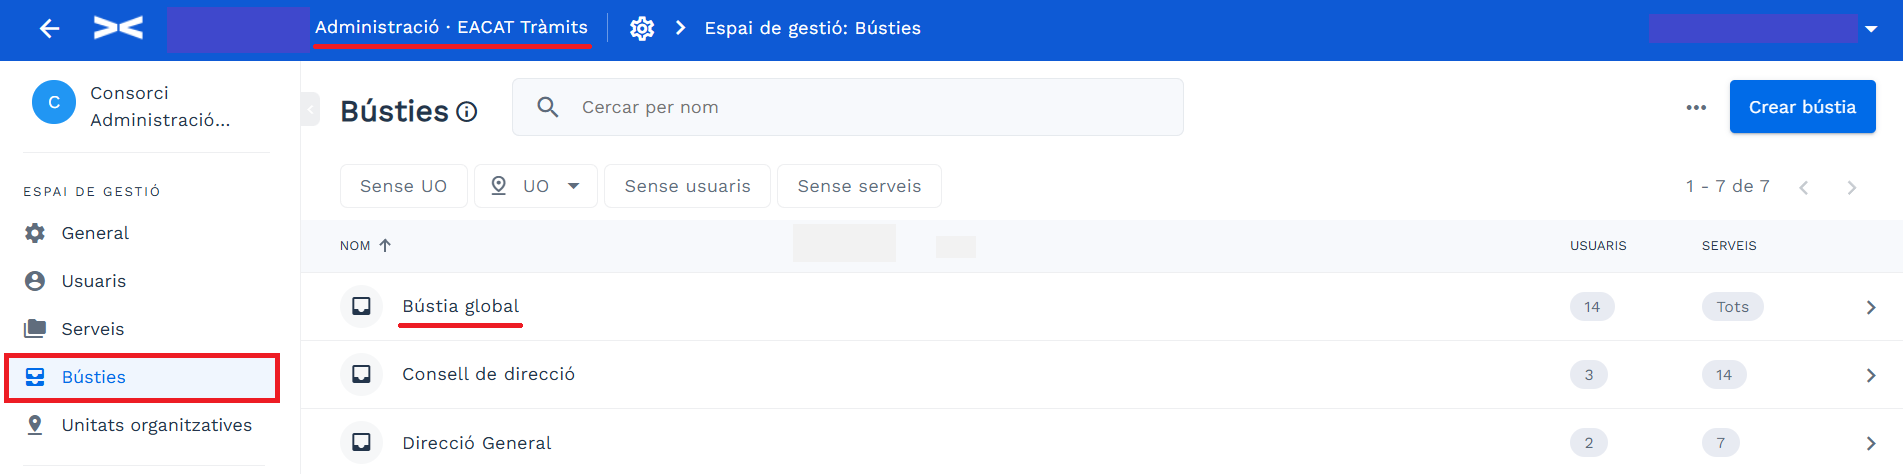
Concrete mailboxes are characterized by:
If you need someone to have access to all services, you will need to specifically add them to the global mailbox.
5. How do you create or delete a mailbox?
To create a mailbox:
If you later want to change or modify the name, select the mailbox and click on the … > Edit name icon.
To delete a mailbox:
Please note that deleting a mailbox has important implications , as it means disconnecting the associated services and users. Furthermore, once deleted, the previous information cannot be recovered.
Remember that the global mailbox cannot be deleted.
6. How do you add services or users?
You can add services and users to a mailbox in two ways: individually or massively, by importing a csv file.
6.1 Adding services or users individually
To assign services to a mailbox individually:
Repeat this process for each service you want to assign to the mailbox.
/p>
The global mailbox already has all services assigned and does not allow you to assign any more. This feature is only available for new mailboxes that you create.
To assign users to a mailbox individually :
Repeat this process for each user you want to add to the mailbox.
6.2 Import services or users using a file
Import is more recommended for mailboxes with a large number of users and services.
Before importing users and services, there are two key situations to consider:
To import services to a mailbox you have created, follow these steps:
To import users to a mailbox , follow these steps:
7. How do you export users and services?
You can download the list of users or the list of services in the Inbox section > select a specific mailbox > ... icon > Export users or Export services in a .csv file.
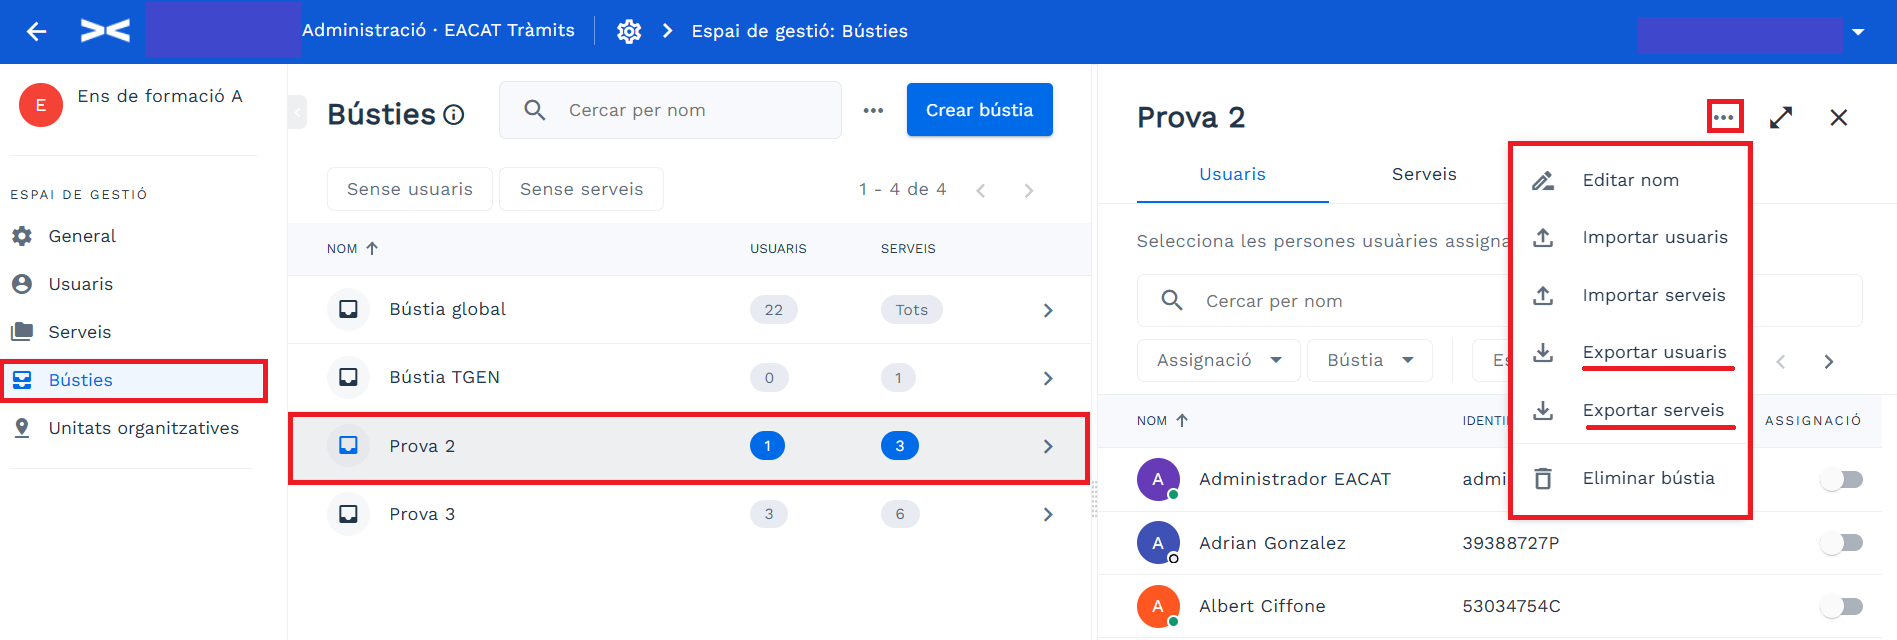
The .csv file is named mailbox-users-XX.csv or mailbox-services-XX.csv .
Fields of the mailbox user file :
Fields of the mailbox service file :
8. How do you export your mailbox list?
You can download the mailbox relationships from the Inbox section > ... icon > Export mailboxes (filtered) . First select the filters you need to narrow the list; or Export mailboxes-services-users (all ).

If you download the filtered mailboxes , the file will be named mailboxes.csv and will contain the following fields :
Export the list of mailboxes, using the filters you consider appropriate.
If you download the mailboxes with the services and users , the file will be named busties-serveis-usuaris.csv and will contain the following fields: