


 Copy link
The Transmission of Information, Writings and Documentation (TMAS) or, also called mass transmission , is a generic service of EACAT, which allows the editing and sending of one or more personalized communications at once, addressed to Catalan public administrations, through a EACAT transmission.
This service is designed for the departments of the Generalitat de Catalunya and for supramunicipal entities.
If you are one of this type of entity and want to use it, your user manager must request the service from the AOC Consortium.
To use the TMAS service you must:
- Be a EACAT user . If you are not, please contact your user manager.
- Have the service and roles ( Shipment Query and Service User ) assigned. If you do not have it, contact your user manager.

- Have the S@rcat registration office assigned where the exit registration entry will be made, if you are a user of a department of the Generalitat de Catalunya. To check this information, contact the user manager of your department.
3.1 Who is my user manager?
You can find out who your manager is in the Home section in the My Managers area. 
- Access EACAT ( eacat.cat ) and log in with your username and password or with your certificate.

- Go to the Applications section

- Click Access the service Sending information, writings and documents

Once inside the service, you must do the following:
- Press Create new batch of submissions or Create a new batch .

a) Step 1: the recipients to whom the shipment is addressed
- To include the recipient public administrations, you have two options:
- You can download the Template administracions.xls to fill it in with the recipient data.
- You can use a template that you have created - always following the format of the Template administracions.xls -. You can add new columns to the Template administracions to personalize the communication. You will find more information in point 6. Recipient data template.
- Press Choose a file to browse to it on your computer.

- Select the Administrations Template , that is, the Excel file (Excel 2003), with the recipient data.

- Press Continue to proceed to STEP 2 .

b) Step 2: Regarding the document to be sent
You can select 3 options:
- I will edit it without using a template.
- I will edit it from the template: you must select one of the templates available.
- I already have it, I just need to attach it.

- In this case, we will select the option I will edit it without using a template , which allows you to create a personalized communication to send using the document editor and its options. We will explain the other two options in point 7. Documents to send.

- Edit the text that the document should contain (official document, letter, notification, request). You will find information on editing the communication in point 8. Editing the submission .

- View a specific shipment by selecting the shipment number and pressing Preview shipment.

- Give it a name and save it as a template if you need to use it more than once. If you only need to use it once, press Continue directly.

- Press the Continue button if you want to continue.

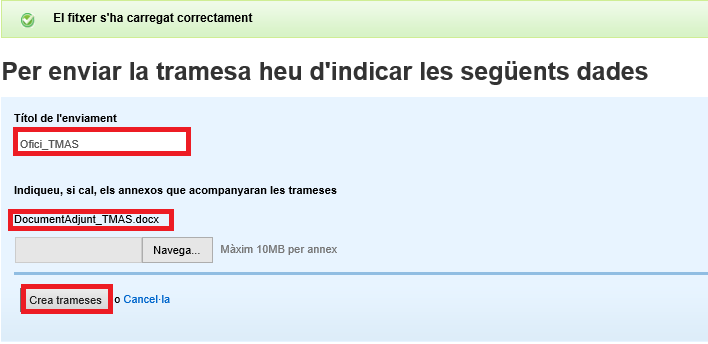
To send the shipment, do the following:
- Write the Title of the shipment -from the TMAS-.
- Press Browse to find the document to attach, if applicable.
- Press Create submissions to finish.
- While the submission is being generated, you will see the following image:

- Once the submission has been generated and sent, you will see the following:

- It's time to find the submission in My Procedures:

The template is an Excel file (Excel 2003), where the data of the recipient public administrations is placed.
As general considerations regarding the format of the template it is necessary to specify that:
- Optional columns, in light gray, cannot be deleted, even if they are empty (have no values).
- The column names are what will be used to identify the fields in the editor and therefore cannot be changed.
- The order of the columns must be respected. It cannot be modified.
The columns that should appear are the following:
- The first column must be called CodiINE . The content of this column is mandatory and must correspond to the 10-digit code of the recipient entities of the transmission. It should be noted that these must correspond to entities affiliated with the EACAT platform. Therefore, it will be validated that all the indicated recipients exist and that they are affiliated with EACAT. Otherwise, it will not allow you to continue.
You can consult these codes in the Municat search engine for local entities in Catalonia , in case you don't know it. - The second column should be called Email . Although it appears, this column does not work, so it is not necessary to fill it out.
- Other columns that I can add. The excel file allows you to add new columns to personalize the communication. The format of the added columns must take into account the type of data that can be: text, date and number. Any other format is processed as normal text.
- Text format, is interpreted as such and is case-sensitive.
- Date format, which is displayed as follows: dd/mm/yyyy .
Number format. For numeric columns, you can optionally add a suffix to the column name indicating the number of decimal places; optionally, you can also add the character € for currency fields. The suffix to indicate the number of decimal places is _Xd where X is the number of decimal places you want; adding an E includes the euro symbol.
Below we show some examples:- CP_0d with value 12345 would result in: 12345
- CP_2d with value 12345 would result in: 12,345.00
- CP_0dE with value 12345 would result in: €12345
- CP_2dE with value 12345 would result in: €12,345.00
Column names can only contain alphanumeric characters without accents. So, accents, spaces, periods, hyphens, etc. cannot be used.
There are 3 options for uploading the document to be sent:
- I will edit it without using a template , it allows you to create a personalized submission using the document editor and its options. You will find more information in point 8. Editing the submission .
- I will edit it from the template , allows you to load a previously stored template.
- I already have it, I just need to attach it . In this option the document already exists and you just need to attach it.

You can only use the editor if the recipients are public administrations and when sending the document you have selected the option I will edit without using a template , which allows you to format the entered text and include custom fields. 
Within the editor you will find options for formatting the text (font, size, color, etc.) alignment and justification (indents, lists, etc.) 
Below are some features of the editor that may be useful when customizing a document:
- Include a logo or image
- Insert a table
- Paste from a Word document
- Import Excel fields
- Preview
- Save as template
- Select the Image icon and you will be able to choose between two options:

- Add a link to an Internet image.
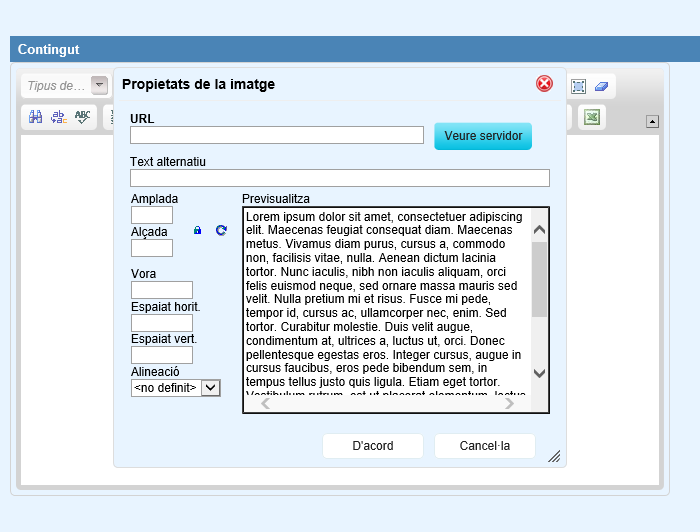
- Upload your own image or use one that exists in the user's directory. To do this, you must:
- Press the View server button and a list of the images that your user has uploaded to their directory will appear.
- You can add new ones by pressing Browse and selecting them on the local computer.
- Finally, you must press Upload to save them to the user's space, which makes them available for future use.
- Add a link to an Internet image.
- Select the Table icon from the editor toolbar to create a table.

- In the Table Properties window that opens, add the table configuration data. The basic table properties that can be modified are:

- Rows , you must place the number of rows in the table, mandatory.
- Columns , you must place the number of columns in the table, mandatory.
- Width , is the width of the table.
- Height , is the height of the table.
- Headers is a drop-down field that allows you to select where the titles will be placed ( First row , First column or Both ), in order to continue formatting the table.
- Edge size , is the thickness of the edge of the table.
- Alignment is how the table is aligned on the page ( Align Left , Center and Align Right ).
- Cell spacing is the space between individual cells.
- Cell padding is the space between the cell border and its contents.
- Table title displayed at the top of the table.
- Table summary is the summary of the table content available to assistive devices (e.g. screen readers). This is a good practice because it makes reading a table more accessible to users with disabilities.
- Advanced , these are some advanced options for finishing formatting tables.
To paste a piece of text from a Word document, do the following:
- Select the text in the Word document and copy it to the clipboard.
- Go to the TMAS service Editor , right at the point where you want to insert the text, and press the Source code icon.

- Press the right mouse button and select Paste or Control v to paste the text into the Editor . Since only unformatted text can be copied, to format the text, you must click the Source icon again.
- You must format the text within the Editor (font type and size; alignment; bold, etc.). It should be noted that this option is NOT used to paste images and that these must be inserted according to the instructions in section 8.1 How to include a logo or image in the submission .
In order to personalize the communication, you must enter the different personalized fields included in the Excel file loaded in the first step into the editor. To do this, click on the icon on the right side of the options bar. 
A window will then open where you can select the name of the field you want to include in the Editor from a drop-down list. 
The editor will add a reference of the type ({$FieldName}) to indicate that that mark will be replaced by the value corresponding to the recipient entity.
These values should not be modified with the text editor directly, it should always be done by selecting the icon and importing them with the plugin.
8.5 PreviewAt any time during the editing of the communication, the user will be able to preview the document to see its final appearance. To do this, the user must click on the Preview submission functionality.
 By default, the document is previewed for the first recipient, but the user can choose any of the first 10 with the drop-down box next to it.
![]()
The shipment that encloses the attached documents or the content that is written is always signed using the electronic seal certificate of the entity assigned exclusively for use of the AOC services. In the event that the entity does not have this certificate, the electronic seal certificate of the AOC Consortium will be used.
 If a template with that name already exists then it will be replaced by the new one.
Although the communication being edited cannot be reused for later use, it is highly recommended to save the document in progress periodically. This way, the work done will not be lost in the event of a communications outage or if you accidentally exit the service.
For these uses we recommend having a template called Document in progress that will be updated each time.